

The right book trim size depends on the content and how the book will be read. A novel may work well in a compact format. An illustrated children’s book may benefit from a larger or square page. A layout with tables, callout boxes or several columns needs enough width to keep those elements readable. There is no single size that makes every book look and feel right.
When a designer asks about the book’s size, “I’m not sure. What would you recommend?” is a perfectly good answer. So is “I like this format, but does it suit the material?”
Professional advice is part of book design. Authors do not need to arrive knowing every trim size by heart. Nobody at the door is checking whether they can tell 5 × 8 from 5.5 × 8.5 at twenty paces.
What is book trim size?
Trim size is the width and height of a finished page after trimming. Width comes first, followed by height. A 6 × 9-inch book is approximately 15.2 × 22.9 cm.
This is not the same as the dimensions of a full cover file or a page that includes bleed. Those are calculated separately to meet the printer’s specifications. Page dimensions and page count are different measurements, too.
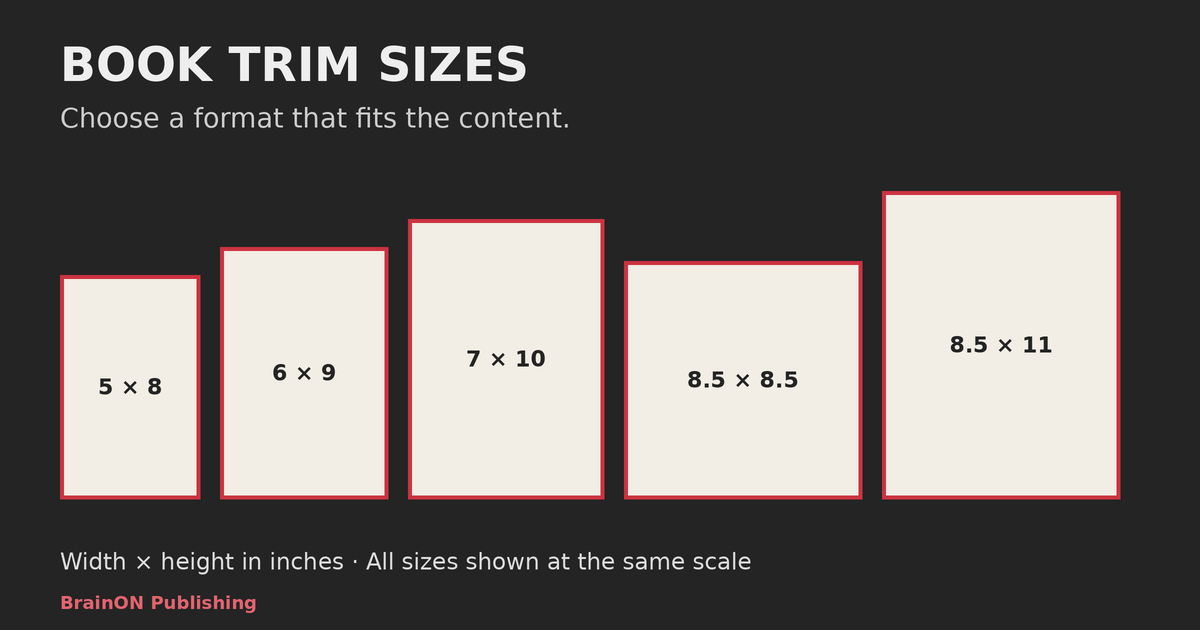
Why “150 pages” does not describe the book yet
A conversation about book layout sometimes goes like this:
“My book is 150 pages.”
“How many words?”
“I’m not sure.”
“Will there be illustrations?”
“Possibly. I haven’t decided.”
The word count is unknown. The illustrations are still under discussion. The chapter list may change. But 150 pages is apparently non-negotiable. The manuscript has not reached its final draft, yet the page count already has a strong personality.
Page count depends on trim size, type size, spacing, margins and design. The same manuscript will occupy different numbers of pages in different layouts. Even if Word currently says 150 pages, the printed book may not.
Larger type can produce more pages. It does not produce more story. The hero still misses the train; it simply takes him longer to do it.
For an initial assessment, the designer needs the word count—or character count—along with the illustrations and structural details. With that information, it becomes possible to choose a suitable format and estimate the finished page count.
A fixed page count can be a genuine project requirement: a planner, a carefully mapped-out photo album or a specific production limit. That belongs in the initial brief.
“Make it 150 because I like that number” is a different proposition. It is rather like buying the roof before deciding how many rooms the house needs. Lovely roof. Now to persuade the house to fit underneath it.
Common book trim sizes: a practical starting point
The options below are starting points for a design discussion, not rules that every book must follow. All dimensions are in inches. Availability depends on the printer and binding.
On a small screen, swipe the table sideways to see all columns.
| Book or layout type | Sizes worth considering | What matters most |
|---|---|---|
| Novels, novellas and predominantly text-based memoirs | 5 × 8; 5.5 × 8.5; 6 × 9 | Reading comfort, book thickness and chapter length |
| Nonfiction with photographs throughout the text | 6 × 9 and larger formats | Image size, captions and placement beside the relevant text |
| Illustrated children’s books | 7 × 10; 8.5 × 8.5; 8.5 × 11 | Reader age, illustration proportions and room for text |
| Books with callouts, tables or magazine-style layouts | 8 × 10; 8.5 × 11; sometimes 8.5 × 8.5 | Column width and the number of elements sharing a page |
| Compact books with a separate photo section | A size suited to the main text, such as 5 × 8 or 6 × 9 | Whether photographs can be separated from particular passages |
5 × 8 or 6 × 9: which trim size suits a novel?
For continuous prose without complex tables or frequent callouts, a compact format is often a sensible choice.
5 × 8 is worth considering when portability matters. 6 × 9 provides more room on each page and, with comparable typography and margins, will generally fit the same text into fewer pages. 5.5 × 8.5 sits between the two.
That comparison alone does not settle the decision. A long novel in a small format may become uncomfortably thick. A short novella on a large page may feel unnecessarily sparse. Shrinking the type just to reduce the page count can turn a pleasant read into an eye test.
Chapter length matters as well. If each chapter contains a few paragraphs and starts on a new page, the designer needs to assess the rhythm of the layout early. Otherwise, three sentences may acquire a very spacious apartment, and the author may wonder why so much of the book appears to be unoccupied.
White space can be beautiful and purposeful. It should be there by design, not by accident.
Illustrated books: image placement matters as much as image count
The presence of illustrations does not automatically call for a large book.
A 5 × 8 novel can work beautifully with full-page drawings at chapter openings: a pencil sketch on the left-hand page, followed by the chapter title and text on the right. Both elements have room to do their jobs without competing for the same corner.
Fitting six photographs, captions and several paragraphs onto one small page is a different task—especially when each photograph needs to sit beside a particular passage.
Technically, almost everything can be made smaller. But if readers are searching a family portrait for faces rather than expressions, compactness has come at a cost.
For a book with many photographs interspersed throughout the text, 6 × 9 can be a useful starting point. It is not a universal minimum. The final choice depends on the images, captions and intended composition; a larger format may be more appropriate.
Making everything fit is only part of the job. Someone still has to look at it.
Nonfiction, tables and multi-column layouts need enough width
Pull quotes, coloured callout boxes, diagrams, tables and captions all need space. Preferably not the exact same space already occupied by everything else.
For complex page designs or magazine-style layouts with two or three columns, wider formats such as 8 × 10 or 8.5 × 11 are worth discussing. 8.5 × 8.5 may suit certain compositions. A page around eight inches wide or more offers additional flexibility, but the actual material still needs to be tested.
A 7 × 10 format may also work. It depends on the columns, tables and complexity of the spreads. One small callout does not mean the whole book needs to become a broadsheet newspaper.
When the format is genuinely too tight, boxes split, captions move and images shrink. Page design gradually becomes Tetris. Except that, in this version, it is reading comfort that disappears.
Adding height does not necessarily solve a width problem. A narrow corridor with a high ceiling is still a narrow corridor.
A real cookbook layout: The Hoodrat Kitchen
This spread from The Hoodrat Kitchen by Tiffany Barber is a real BrainON Publishing project. The existing 3D presentation shows how several different elements share the available space.
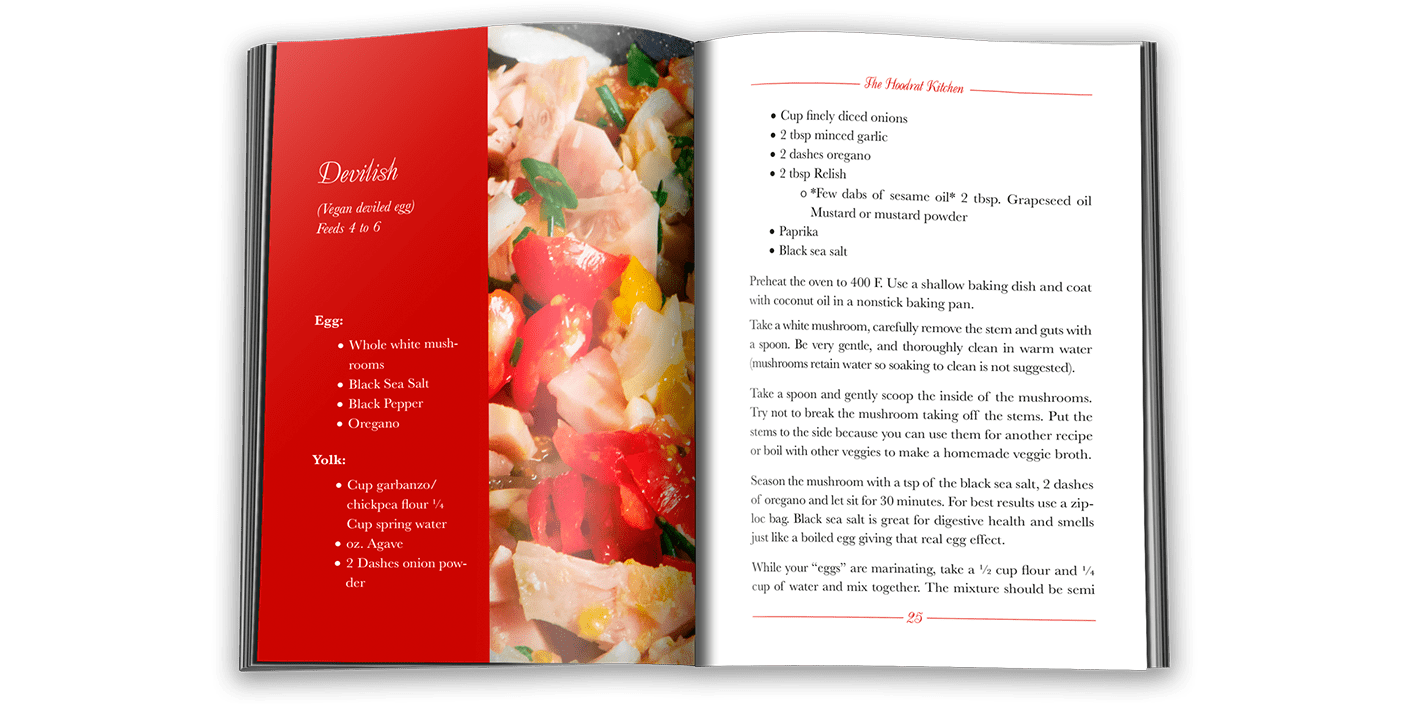
The left-hand page combines a red panel containing the recipe title and some ingredients with a food photograph. The right-hand page continues the ingredients and carries the preparation text. Each element needs room: long ingredient names must remain readable, the photograph needs enough space to be useful, and the instructions need a comfortable line length.
Simply scaling this composition down would make the text and photograph smaller together. A compact version might still work, but the designer would need to reconsider the column widths, image placement and text flow rather than press “shrink” and hope dinner sorts itself out.
The practical lesson: choose a cookbook trim size around the recipe’s structure, not just its word count. Ingredients, instructions and photographs have to work together. The meal can be an experiment; finding the next step should not be.
For similar decisions about your own manuscript, discuss your book layout with BrainON. Include the word count and examples of your illustrations or more complex pages.
How to choose a children’s book trim size
For an illustrated children’s book, 7 × 10, 8.5 × 8.5 and 8.5 × 11 are useful options to consider. A larger page can give readers room to explore details, follow the action and find the text easily.
Bigger is not automatically better, however. The child’s age, the reading experience and the illustrations all matter. A picture book shared with an adult and a chapter book for independent reading have different needs.
Check the proportions of the artwork, too. A wide scene designed for a double-page spread may not fit comfortably on a single tall, narrow page. It may need to be reduced, cropped or reworked.
Even a fairy-tale dragon should have somewhere to put its tail.
Agree on the format before the illustrations are finalized whenever possible. If the artwork already exists, the designer needs to see it before promising that a particular size will work.
Lots of photographs, but a small book: consider a photo section
In a memoir or family history, photographs can sometimes be gathered into a dedicated photo section. The main text stays compact, while the images receive their own carefully arranged pages and captions.
This can work well when the photographs enrich the story without needing to accompany individual passages.
It may be a poor fit for teaching material, recipes or step-by-step instructions. If the directions are on page 37 and the photograph explaining them is on page 218, readers will need patience as well as a bookmark.
A separate gallery is a way to organize material—not a universal rescue plan for an undersized page. For the separate question of image quality, see the guide to preparing original image files for book printing.
KDP and IngramSpark trim sizes: check print options before layout
The format must be available where the book will be printed. Before layout begins, check the current combination of trim size, binding, paper, colour options and permitted page counts.
For example, Amazon KDP offers different trim-size selections for paperback and hardcover books. A size available for one binding is not automatically available for the other. Check the intended combination separately with IngramSpark as well. Consult the current KDP print options and IngramSpark trim-size guidance before committing to a format.
A smaller page does not necessarily mean a cheaper book to print. The page count may rise, and production choices affect the calculation. Compare the options instead of assuming the printer will reward the book for taking up less shelf space.
Agree on the trim size before full layout. Changing it can require text, illustrations and tables to be rearranged. Once the final page count is established, the cover dimensions—including spine width—can be confirmed.
How to make the final decision
A few practical steps can turn a vague preference into a workable format.
- Show the designer the material. Provide the text volume, structure and a clear picture of the illustrations, tables and callouts.
- Explain how the book will be used. Will readers carry it, share it with a child, keep it open on a desk or write in it?
- Narrow the choice to two or three suitable sizes. Compare similar books in your hands, not just dimensions on a screen. Examples of finished book designs can also help clarify the kind of result you want.
- Test demanding pages at their actual size. A sample spread with the widest table or several photographs reveals more than “It should fit somehow.” Print the sample at 100% scale.
- Confirm the print specifications before full layout. The format should support the design, not become an obstacle the designer has to work around on every page.
Authors can have sound reasons for wanting a particular size: an existing series, the artwork or the way the book will be used. The designer needs to understand those reasons and have room to suggest an alternative when appropriate.
A recommendation to increase the page size does not necessarily indicate a secret agreement with paper manufacturers. The designer may already see that the photographs will be too small. Recommending a compact format is not a plan to ration the design, either. It may simply make the book more comfortable to read.
Instead of “Make it exactly 150 pages,” a more useful starting point is: “Here is the material, and here is the kind of book it needs to become. Which size will work best?”
Choose a size that fits the book—not a size the book has to struggle to fit.